Recycled art is everywhere these days and for good reason. If you’ve ever looked at a pile of paper, or a cool shape of Styrofoam from delivery and thought,
“I bet I can use this somewhere…”
you’re absolutely right.
Enter the world of recycled crafts for kids — where cardboard boxes become castles, toilet tubes become rockets, and milk cartons turn into zoos. This isn’t about perfection or Pinterest-worthy projects. It’s about giving your child simple materials, a gentle prompt, and the freedom to explore.
These trash-to-treasure activities are more than just upcycling.
They’re an invitation to open-ended play — the kind that:
- sparks imagination
- builds problem-solving skills
- strengthens fine-motor development
- encourages independence
- and gives parents a much-needed moment of peace
With just a few recycled materials and a dash of creativity, you can turn boredom into brilliance — without spending a penny.
This post will walk you through:
- how to set up a Recycling Play Kit
- how to issue prompts that encourage independent play
- how to model creativity without taking over
- and 5 simple trash-to-treasure craft ideas to get you started
Make yourself a cup of something warm.
Let’s turn your recycling into a playroom superpower.
Why Recycled Crafts Work So Well for Kids (and Parents)
Before we jump into the “how,” it’s worth pausing to notice why this works so beautifully. And if you haven’t already set up a craft zone, you can have a look at this post for some inspiration.
1. Kids Love “Real” Materials
Children are naturally drawn to the things we use in everyday life.
A printed cardboard box feels more “real” than a toy plastic house.
Bottle caps feel more interesting than pre-made beads.
Toilet tubes become tunnels, binoculars, animals, towers…
Recycled materials are:
- familiar
- varied in texture and shape
- open-ended (no “right” way to use them)
This is exactly what their brains need for creative, flexible thinking.
2. There’s No Pressure to Get It “Right”
Because these materials were “trash” five minutes ago, nobody is worried about ruining them.
That means:
- less perfectionism
- more risk-taking
- more experimentation
- more genuine creativity
If a robot doesn’t stand up?
No problem — add more tape, or turn it into a spaceship instead.
3. It’s Eco-Friendly and Budget-Friendly
You’re not spending money.
You’re not adding more plastic to the house.
You’re quietly teaching:
- resourcefulness
- sustainability
- and the idea that joy doesn’t always come from buying new things
That’s a powerful message in a world of “unboxing” videos.
4. It Buys You Real, Guilt-Free Downtime
Recycled crafts are brilliant for:
- slow Sunday afternoons
- post-school decompression
- weekends when the weather is awful
- days when screen time has already stretched longer than you’d like
With a little setup, you can genuinely say:
“You’ve got everything you need in the junk box. Show me what you make!”
And then sit down.
That’s the part we sometimes forget — creativity can help your nervous system, too.
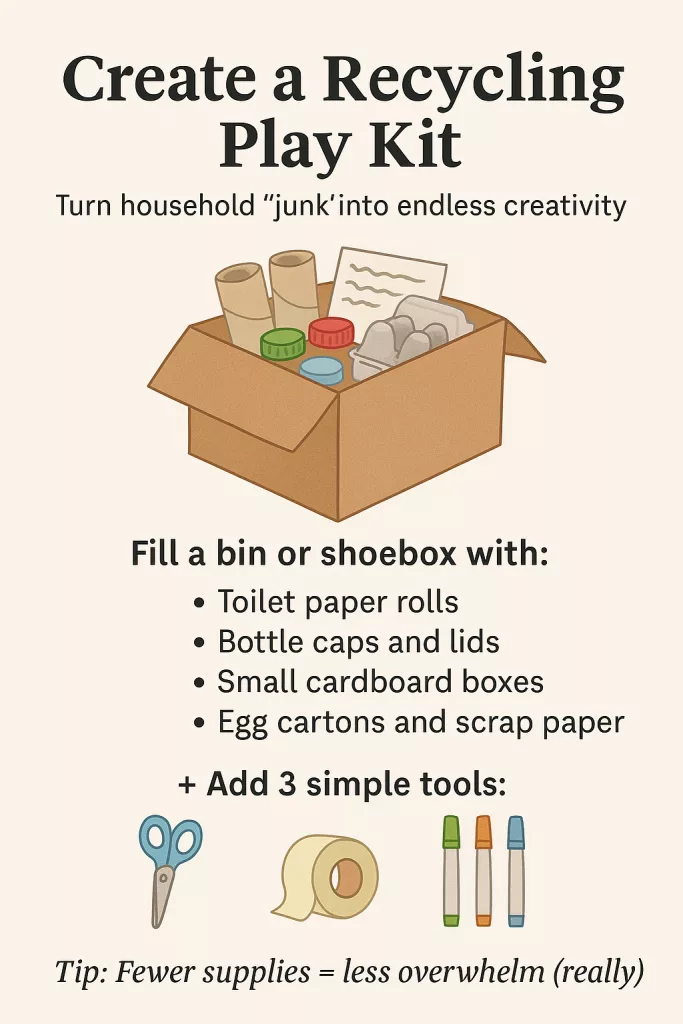
Step 1: Create a “Recycling Play Kit”
Most craft overwhelm starts with this thought:
“I don’t have the right supplies.”
The Recycling Play Kit solves that by becoming a standing invitation to create.
What You Need
Keep a small bin, basket, or shoebox labeled something fun like:
- “Junk Box”
- “Inventor Box”
- “Recycling Lab”
- “Maker Kit”
Inside, collect:
- Toilet paper rolls
- Paper towel tubes
- Bottle caps and lids (different sizes and colours)
- Small cardboard boxes (tea boxes, cereal boxes, snack boxes)
- Egg cartons
- Scrap paper (old envelopes, misprints, packaging paper)
- Clean plastic tubs (yoghurt pots, small containers)
You don’t need everything at once.
Start with what you have this week and let it grow slowly.
Add Three Simple Tools
To keep things easy and safe, choose just a few basic tools:
- child-safe scissors
- tape (washi tape, masking tape, or clear tape)
- markers or crayons
That’s it.
You can always introduce:
- glue sticks
- stickers
- string or yarn
- a few pompoms or googly eyes
…but they’re optional extras, not essentials.
Why Limiting the Options Actually Helps
It sounds backwards, but it’s true: too much choice can be overwhelming, even for adults.
When kids sit in front of a giant table full of supplies, they often don’t know where to start.
When they open a small box with 6–8 kinds of materials, their brain thinks:
“Okay. I can handle this. Let’s try something.”
Limiting the options:
- reduces frustration
- boosts creative problem-solving
- encourages them to use each material in multiple ways
Your Recycling Play Kit is not meant to be a craft store.
It’s meant to be a starting point.
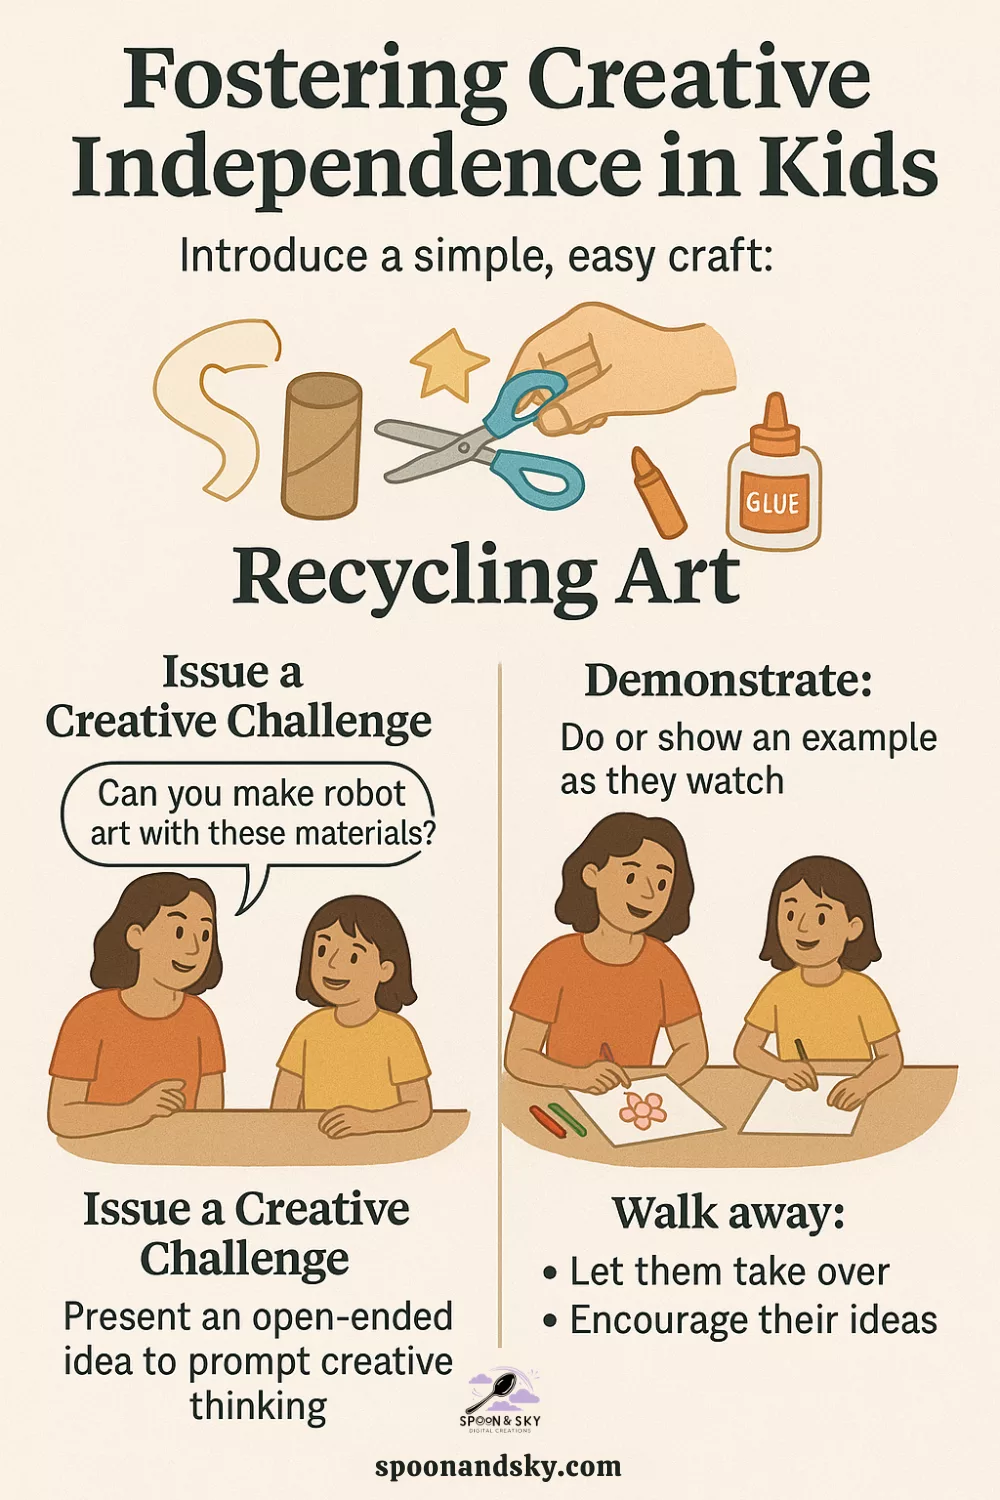
Step 2: Issue a Creative Challenge (Not Instructions)
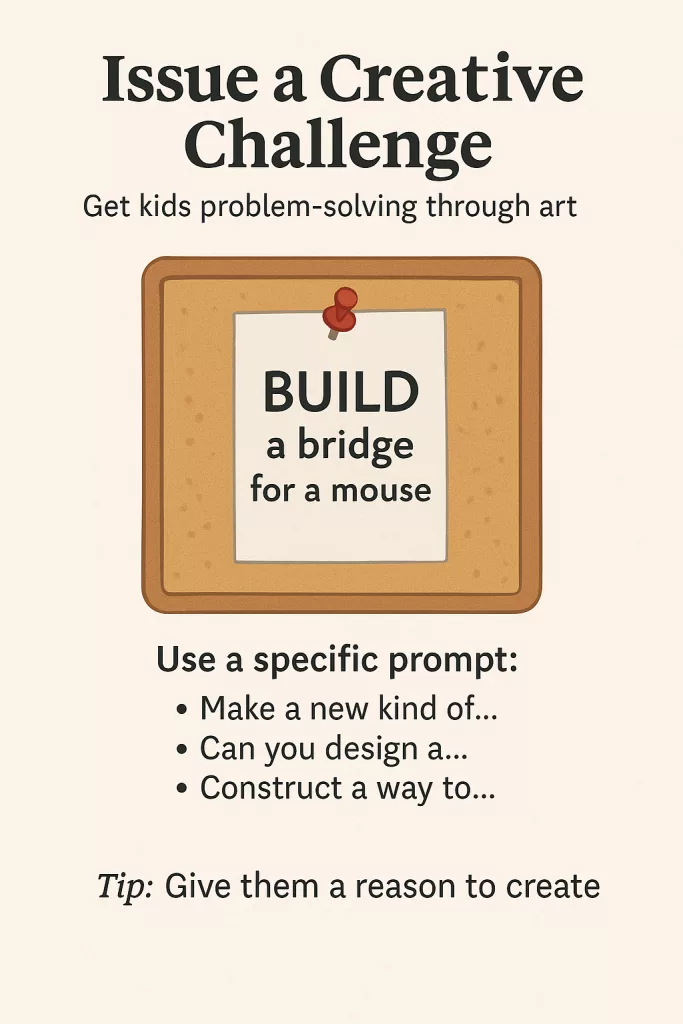
The magic phrase for this kind of play is:
prompt, don’t prescribe.
Instead of giving step-by-step instructions (“Glue this here, colour this bit yellow…”), you offer a loose challenge that gives purpose but leaves freedom.
Think of it like giving them a mission.
Example Prompts to Try
Here are some imaginative challenges you can use:
- “I need a miniature city for the tiny cars.”
Suddenly, toilet tubes become towers, bottle caps become fountains, boxes become garages. - “Can you build a safe home for your stuffed animals?”
Kids begin thinking about walls, roofs, doors, and comfort — they’re learning about structure, empathy, and design without knowing it. - “The recycling monsters are coming — quick, build a hiding spot!”
This adds playful urgency and a bit of story: Where will they hide? How strong does it need to be? Who goes inside? - “We need a new robot helper for our house. What can it do?”
They’ll add buttons, arms, and features like “cookie maker” or “toy finder.” - “Can you make a postbox so we can send letters?”
Suddenly, they’re folding envelopes, writing names, and delivering mail.
The goal isn’t a perfect end product.
The goal is focused, imaginative play.
Give Just Enough Structure
You want a balance:
- Too open-ended: “Do whatever you want.” → Some kids freeze.
- Too controlled: “Glue this here and that there.” → Creativity shrinks.
A good prompt:
- suggests a function (a house, a city, a robot, a hiding place)
- leaves the form up to them (how it looks, what they use, what details matter)
This is where independent play really starts to grow.
Step 3: Model, Then Step Away
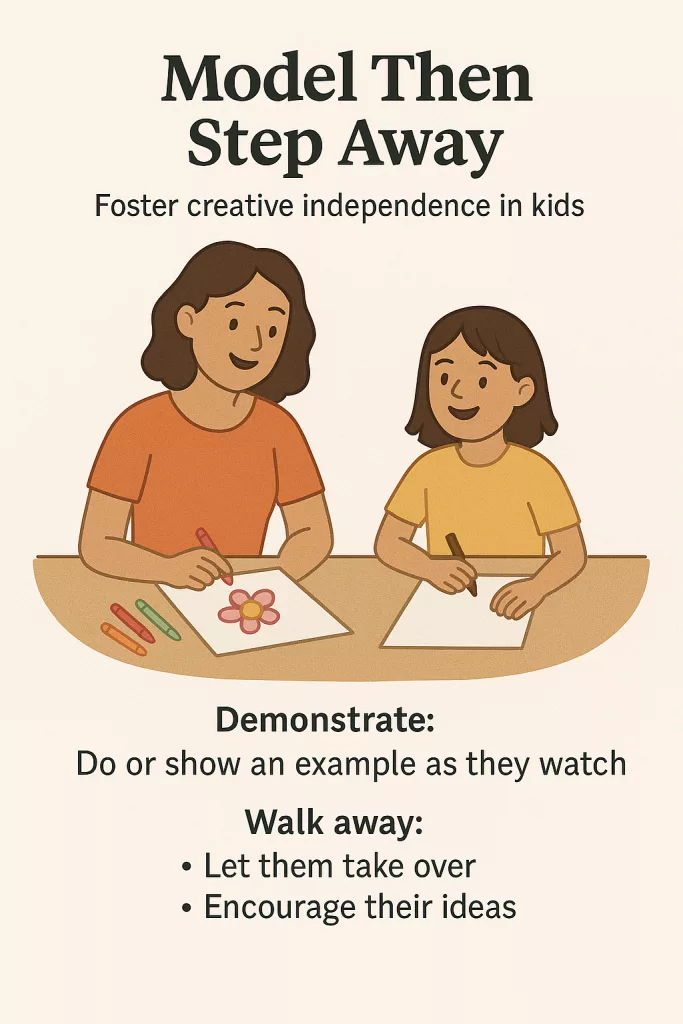
This part is crucial — and sometimes the trickiest for us as adults.
Children often need a tiny bit of modelling to get over the “I can’t” hump. But if we stay too involved, they shift into “watching” mode instead of “creating.”
So we’re aiming for:
“Show a little, then slide into the background.”
How to Start the Play Together
Sit with your child for the first 3–5 minutes:
- tape two boxes together to show how they can stack
- cut one door in a cardboard house
- draw three windows on a robot
- help fold one tiny envelope
Then, instead of taking over, you gently hand it back:
“I started this bit — can you finish it?”
“I’ve made one window. Do you want to make the rest?”
“I can’t decide what this should be… what do you think?”
You are passing the creative baton.
The Power of Side-by-Side Play
Once they’re going, shift into what I call “quiet presence”:
- sit on the floor nearby
- read a book
- sip your tea
- occasionally look up and smile or comment (“I love how tall that tower is getting!”)
But don’t rush in with fixes or ideas.
Let them meet a wobble and figure out how to solve it.
This is where:
- resilience grows
- problem-solving happens
- confidence blossoms
A Helpful Script
Try saying:
“I’ll be right here reading while you build your masterpiece. If you need help with scissors or tape, just ask.”
You’re reassuring them:
- you are available
- you believe they can handle this
- you trust their choices
That safety + freedom combo is gold.
5 Trash-to-Treasure Project Prompts
Ready for some concrete ideas?
Here are 5 simple projects you can suggest using your Recycling Play Kit. All of them are flexible, so your child can adapt them however they like.

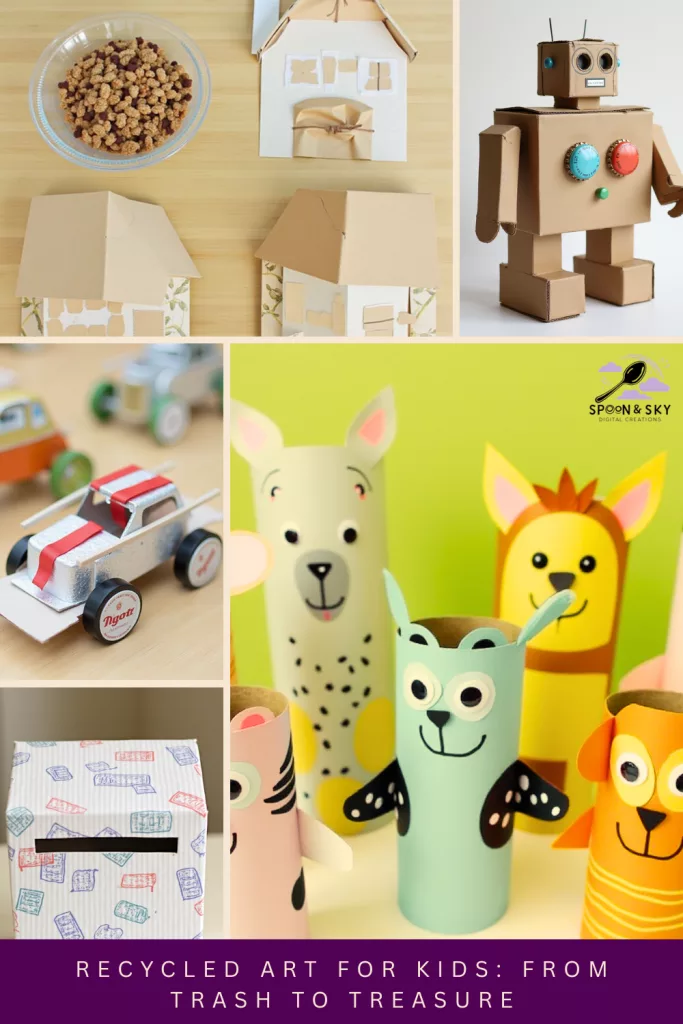
1. Cardboard Box Robots
Materials:
- one small or medium cardboard box
- bottle caps and lids
- scrap paper
- markers or crayons
- tape
Prompt:
“Let’s build a robot helper. What jobs can it do for our family?”
Ideas:
- use bottle caps as buttons and dials
- draw a face on the front
- tape on paper arms and legs
- add a slot for “messages” everyone can post inside
You might end up with:
- a “tidy-up” robot
- a “joke-telling” robot
- a “secret-message” robot
However it looks, your child is designing, planning, problem-solving — and owning the project.

2. Toilet Tube Zoo
Materials:
- toilet paper rolls
- scrap paper or coloured card
- markers
- tape or glue
- googly eyes (optional)
Prompt:
“The zoo animals escaped! Can you make them new bodies?”
Ideas:
- wrap tubes in coloured paper to create fur or skin
- draw faces and patterns
- add ears, tails, wings from cut paper
- stand them up and arrange as a zoo, farm, or fantasy world
You can layer in learning by asking:
- “What does this animal like to eat?”
- “Where would it sleep?”
- “Is it loud or quiet?”
But keep it playful, not quiz-like.

3. Mini Mailbox & Letters
Materials:
- a small box or carton
- scrap paper and envelopes
- pens or markers
- stickers (optional)
Prompt:
“We need a postbox for our house. Everyone needs mail!”
Ideas:
- cut a slot in the front of the box
- decorate it with your family name or a pretend street
- make simple letters to stuffed animals, siblings, or grownups
- “deliver” post around the house
This is brilliant for:
- early writing
- name recognition
- empathy (“What message would make them smile?”)
And you’ve just created a game that can be reused again and again.
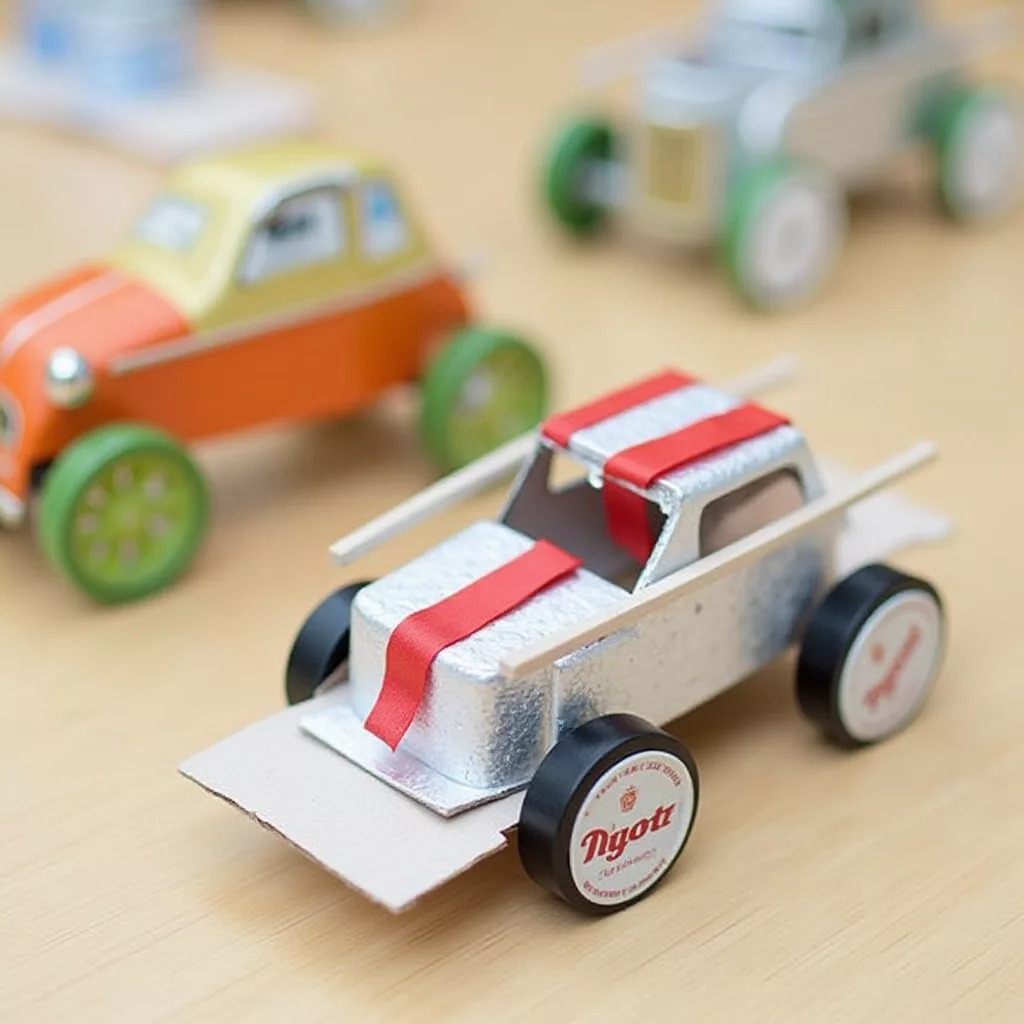
4. Bottle Cap Cars
Materials:
- bottle caps and lids
- thin cardboard pieces (cut from boxes)
- straws or wooden skewers (for older kids, with supervision)
- tape
Prompt:
“We’re designing the fastest cars in the recycling world!”
Simplify as needed:
- Younger kids can just tape caps onto card and call them cars.
- Older kids can experiment with axles using straws and skewers.
Once built, draw a road on a big sheet of scrap paper or an opened-out box.
Suddenly, you’ve got a whole transportation system made from what would have gone in the bin.
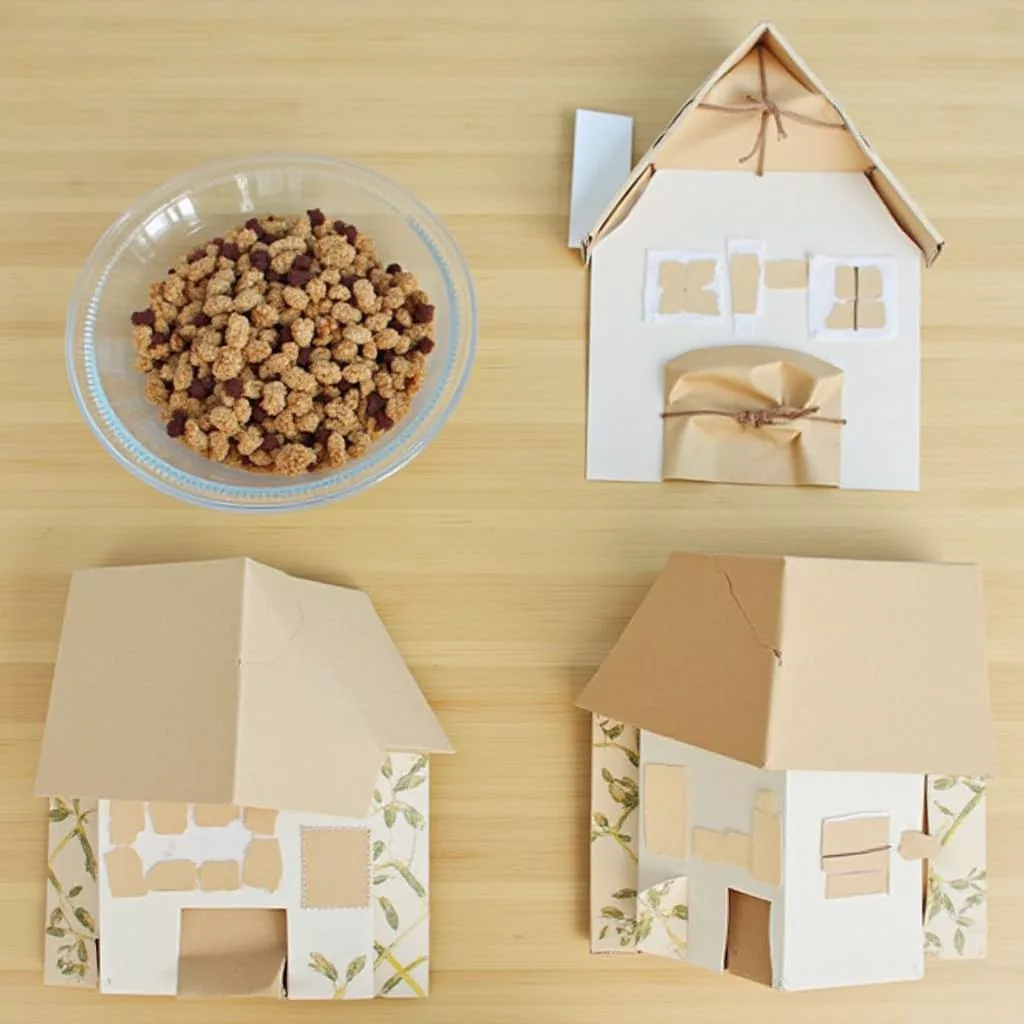
5. Cereal Box Houses
Materials:
- empty cereal or cracker boxes
- markers and crayons
- string, stickers, fabric scraps (optional)
- tape
Prompt:
“Can you turn this box into a house for your toys?”
Ideas:
- draw doors and windows
- cut flaps to open
- create curtains from scrap fabric
- use string as washing lines or wiring
- make a whole street of houses if you have multiple boxes
This can become:
- a dollhouse
- a street for toy cars
- a town for animal figures
Again, the goal isn’t realism.
It’s layering story and environment into their play.
The Bigger Picture: Creativity Over Consumption
Here’s the quiet truth humming underneath all these activities:
You don’t need new toys to inspire wonder.
You don’t need:
- a fully stocked craft cupboard
- expensive kits
- complex instructions
You just need:
- a bit of space
- a small box of scraps
- a gentle prompt
- and permission (for both of you!) to explore without pressure
Each project teaches:
- resourcefulness – using what you have
- independence – starting and finishing their own ideas
- problem-solving – fixing wobbly walls, rethinking designs
- patience – things don’t always work the first time
- confidence – “Look what I made from nothing!”
Those are vital life skills, disguised as fun.
And for you, it’s an invitation to release the idea that “good play” = curated toys and perfect setups.
Your recycling bin already holds a world of possibilities.
How to Make This a Gentle Family Ritual
If you’d like recycled crafts to become a regular part of your rhythm, try:
- “Maker Mondays” – 20 minutes after school with the Junk Box
- “Slow Saturday Mornings” – coffee for you, cardboard city for them
- “Screen Break Station” – when a timer goes off, suggest: “Want to see what’s inside the Inventor Box today?”
You don’t have to do it every week.
You don’t have to photograph every project.
Just know that each time you say:
“We could use the recycling for that,”
…you’re quietly shifting your child’s understanding of creativity, ownership, and what’s possible.
Creativity doesn’t live in expensive kits or curated craft cupboards — it lives in the ordinary things around us. Your recycling bin is already full of invitations to play, explore, make mistakes, solve problems, and dream up worlds that never existed before. When you offer your child a small box of scraps, a simple prompt, and the freedom to follow their ideas, you’re not just filling an afternoon — you’re building confidence, independence, imagination, and calm. And that is the kind of magic that lasts.
With a quiet cup and a spark of creativity,
Lily x — Spoon & Sky

✨ Get Your Free Printable ✨
Looking for a simple way to bring a little more calm, structure, or creativity into your day?
Enter your email below and get instant access to your free printable from Spoon & Sky — made to spark joy, imagination, and gentle rhythms at home. 🌿
We’ll send your printable and a few kind, helpful ideas to your inbox. No spam — just calm, creative family tools.
Leave a Reply